I recently decided I didn't like the look of my office area and decided to revamp a few things. I posted about the desk I painted and now am going to try (notice I said try) to give a tutorial on the ottoman cover I made. :) Here it goes...if you have questions, please contact me and I will try to explain as best I can.
Desk before....
Desk After...
Ottoman Before...
Ottoman After...
Ok...So let's begin.
1. My ottoman was 17 inches wide on every side and 19 inches high. At this size you will need 1 yard of fabric.
2. You will need four panels for the sides and 1 for the top.
3. Cut each of the side panels 1 inch longer than the width of the ottoman (for me it was 18in.) and 3 inches longer in height than the height of the ottoman (for me that was 22in.) This allows for a 1/2 inch seam allowance and hem.
4. Now cut the top panel 1 inch bigger in width and height than the ottoman. (Mine was 18x18 since my ottoman top was 17x17)
5. With right sides together, sew all side panels together at side seams creating a sort of circle.
6. Now for the tricky part. Take your top panel and at each corner, fold the corner into a triangle. This is a different piece of fabric just for explanation on a larger scale.
Ok...now concentrate. On this next pic, you will see a straight pin and a faint line. You are going to stitch 1/4in. in from the point of your triangle right where the straight pin is and NOT the line. I did this wrong the first time around and had to rip out and redo. :)
If you will lay your fabric flush with a line as I have mine here and put the pin facing down that will be correct. Basically, you need to stitch STRAIGHT down from the folded edge and NOT diagonally from the folded edge.
7. Do this to all four corners of your top panel. Turn corners right side out when you are done.
8. Now, with right sides together, pin your top panel to the 4 side panels matching the corners. You will need to pin all the way around as you will have a little more top panel fabric than side panels. (This is bc the seam allowance has been completely taken up in the side panels, but not the top with only 1/4 corners but it will all even out when you put it together in the end and give your cover room to fit snugly over the actual ottoman.)
You will need to match the seams (flatten the triangle seam) at each corner and ease in the fabric until you reach the next seam.
9. Stitch all the way around using a 1/2in. stitch. When you get to each corner, lay the triangle down being careful to keep the seam underneath open and flat. You will sew a regular straight corner as best you can. If you can't get a perfect corner, or the top panel corner point seems to stick out more the the side panels, that is ok. It is better for it to be a little snug than for you to have points on all four corners. As you can see from the pic, I ended up with somewhat of a rounded corner. The main thing is to make sure that those seams are open and flat on the right side of the fabric.
10. Whew...got through the most difficult part! Ok. Now turn your cover right side out and try it on your ottoman. It will probably be quite snug, but don't worry, you did not make it too small! Ease it on slowly working it down.
11. You should have a bit of extra on the bottom which we will use as our hem. Take a straight pin and place it where you want the cover to stop (just before the floor is best)
12. Next, take your cover off again. If you have a serger, you can just serge this bottom edge and fold it up to your pin and blind or hand stitch the hem. If you are not using a serger, then you will need to make two folds. The First One- about a 1/2 inch up, and the Second One- up to your pin. Use a hem gauge or tape measure to be sure you are folding the correct amount up all the way around. Iron your fold as you go.
13. Last step! YAY! If you know how to use a blind stitch on your machine, go for it. If not, hand stitch your hem all the way around and you are done. Iron the hem one more time as well as the other seams and put your new ottoman cover on! What a difference just an ottoman cover can make!
Here are a few other cute ottoman ideas I found. I have also done pleated ottoman covers, but not sure I can explain all that! :)
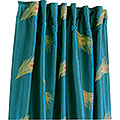
I am hoping to post a tutorial in the next couple of weeks on making drapes with horizontal stripes like the ones shown here.
I recently did a cover for a client for an ottoman like this and she added nail heads all the way around the middle dip. Very nice!
Easy addition with the piping.
Will have to try this also!
This is a great idea for extra storage space. Maybe a different color? :)


